Sunday, February 28, 2021

Mad Max Game Analysis

You can find the video version of this analysis here.

Overview

Mad Max is an open world action driving/brawler hybrid based in the Mad Max universe created by George Miller in 1979. The Swedish company Avalanche Studios started development from 2012 and it was published by Warner Bros in 2015.

Formal Elements

Players

You play as the eponymous Max, a former Australian police officer who lost his wife and children to a violent gang attack in a future Australia where society's rules are crumbling. Although undoubtedly inspired by earlier figures like Clint Eastwood's Man with No Name, Max has been a huge influence on later lone anti-hero figures in cinema: Riddick and The Mariner from Waterworld being two examples.
Max begins the game in a similar situation to the film, Mad Max 2: He is driving his famous Interceptor car across the wasteland searching for enough fuel to cross the Plains of Silence. He is suddenly attacked by the main villain, Scabrous Scrotus, a son of the villain from the movie Mad Max: Fury Road, Immortan Joe. Although it appears that Max kills Scrotus, Scrotus' followers take Max's car and leave him for dead.
Following the characterization in Mad Max: Fury Road, Max has visions and has been driven over the edge by a combination of his traumatic experiences and the isolation involved in post-apocalyptic life.
Max is the only playable character in the game, and it is primarily a single-player experience, although there are some racing activities which can be completed together with friends online.

Rules

Combat and Movement

The combat of Mad Max has been heavily inspired by the Batman Arkham series developed by Rocksteady Studios. Similar to that series, Max can pummel wastelanders using his fists, counter their regular attacks, dodge their unblockable attacks, and use his shotgun to deal massive damage quickly. The shotgun replaces Batman's larger arsenal of tools such as the batclaw, batarang, and others.
As you counter, finish, and attack enemies successfully, you build up a combo counter that can send Max into a "Fury" mode, where your attacks deal more damage. Failing a counter or taking damage resets the combo counter. Like in the Arkham series, enemies come in a decent variety that force the player to use certain strategies against them. Your typical grunts can be wailed on to your heart's content, but shiv-wielders are fast and will dodge your attacks, forcing you to wait for their attack in order to counter them. Brawlers will block your attacks, and attack in heavy-hitting two punch combos or in unblockable grapples that pin you for their friends to take advantage of. Enemies with a larger weapon such as a club, axe, or machete attack more rarely than the other types, and can sometimes be tricked into taking out some of their friends with their wild swings. These weapons can be picked up and used until they break, or dropped at any time. Using your shotgun will automatically drop them. Shield carrying enemies have a number of unblockable attacks, and their shield must be destroyed before you can do damage to them. One last interesting enemy type is the warcrier, who is suspended above the battle and beats on a drum while exhorting the other enemies to attack you. This fills a meter that makes them "inspired," dealing more damage.
Where Mad Max departs from Batman is in the embrace of certain timing based elements and in lethality. For example, in the Batman Arkham series, as long as the distance and timing are within certain limits, you can counter any enemy. In Mad Max, however, Max does not have Batman's athletic training and will not zip around the combat arena, so you must be more aware of the distance between you and the enemy you wish to counter, and you must also take into account timing. You can trigger some special abilities if you match the timing of your counter "perfectly." On the other hand, you can take a small amount of damage but still block the attack if you bungle the timing. This is similar to the "active reload" feature of the Gears of War games, and adds a further element of challenge and mastery to the combat.
The shotgun Max carries allows him to quickly kill a single unarmored enemy, or to eliminate an enemy in an unreachable position. However, ammo is quite rare, and you can only hold a small number of shells at a time. The second element of lethality is the shivs that Max can pick up from knife wielding enemies and around bases. These can be used to finish off a stunned or downed enemy.
Another departure, in this case negative, is in the animation system itself. In the Batman Arkham series, the enemies' animations are all locked to Batman's state. So, if Batman is in the middle of a punishing finisher move, no enemies can attack you. This creates a feeling of reliability while in combat, because you can always count on being "safe" when you enter an attack or move with a long animation time. In Mad Max, they made the same mistake as CD Projekt Red did in The Witcher III: Wild Hunt: they try to combine the cinematic feeling of the Arkham series with the more realistic enemy attack timing of Dark Souls. This means that during many of your inescapable animations, you can still be attacked by enemies. During my 40+ hours with the game, I found few reliable animations that would 100% of the time prevent enemies from attacking me. The Wall Slam or Wall Finisher animations were most reliable, but even these sometimes do not block enemies. I'm not sure if this was deliberate, in order to create a feeling of unease in the player, or if this is simply the animation systems not communicating effectively. While you get used to this uncertainty, it detracted from my enjoyment of the combat.
The game features an autosave system that prevents you from losing too much progress if you die. For example, while trying to clear an enemy base, you might face between 3-5 groups of enemies, each with different numbers and types - one group of two grunts, a knife-fighter, and 3 brawlers, another group of 2 shield-carriers, a brawler, and 5 grunts, etc. If you die on any group, the previous groups you've faced will remain defeated, and any scrap, objectives, or collectibles you've picked up will remain cleared. You will respawn just outside the base and have to make your way back to the group you died on.
Outside of combat, Max can walk and run around, jump and climb on different structural elements. Due to the size and emptiness of the game world, it is best traversed using a vehicle. The different scavenging locations and bases often feature ladders, zip-lines, and climbable elements marked in strong contrastive colors to signal that they are climbable. If it is not marked in this color, Max's extremely low jump probably will not clear it.
On to vehicle movement and combat. The vehicles interact with the world in mostly realistic ways. The tires grip asphalt and slide through the sand, rocks bump you into the air. By default there is roll assist, which mostly prevents the cars from flipping over, although I did manage to get the car stuck on its side once or twice. As you drive, the fuel tank will slowly drain, but this can be refilled at a base if you have the appropriate upgrade, or you can collect gas canisters at enemy bases or other scavenging spots. You can modify your main car in a large number of ways. There are several car bodies to find throughout the game, and these change the overall look of the car, but then there are the performance modifiers. You can install different upgraded versions of a V6 or eventually V8 engine, which influences your top speed, acceleration and handling; armor, which protects you from enemy cars and increases the weight (slowing the car down and reducing acceleration and handling), different rams, suspension systems and exhaust, different tires for asphalt or sand, rims that damage cars you grind against, and lots more. For weapons, there is a harpoon, used to latch onto structures and vehicles to rip away armor, doors, or wheels; a thunderpoon, which is an explosive rocket weapon, a sniper rifle for taking out snipers in towers, and flamethrowers mounted on the side of your car to damage enemies next to you. There are also cosmetic changes, such color, decals and both front and rear ornaments.
Driving around the map is a real pleasure. If you reach max speed, you can hear the wind whooshing by, and car generates wind particle effects as you barrel down the mostly abandoned highways. The engine revs up, and you get a bit of tunnel vision as well from the camera changing the field of view. At the beginning of the game, your car, the Magnum Opus, will be quite weak, and you will have to disengage from enemies more often than you engage them. At a certain point, the tables are turned and you will become something of a hunter, actively taking out groups of roving bandits or convoys. You can ram into cars or enemies on foot, and you'll get a damage boost if you use your nitro, or you could use your shotgun, harpoon, and thunderpoon. Sometimes cars with loads of extra enemies will pull up besides you and the enemies will leap over to your car and try to attack you as you drive. You can even ricochet between cars on either side of you as you smash their doors and remove their armor plating.
On the subject of damage, once your car reaches zero "health," you will have 5 seconds to get out before it explodes. If you don't make it out, your car will explode, taking you out with it. If you do, you have a few options. If you are driving your Magnum Opus, your BlackFinger Chumbucket will begin to repair it. You'll have to wait until the car's "health" reaches halfway before you can hop in and continue. If you are driving another car, you'll have the option of spending a certain amount of scrap to repair it instantly, as Chumbucket is only available in the Magnum Opus. If you die outside of an enemy base, you will be returned to the nearest friendly base.
Returning to driving other cars, it is possible to drive any enemy car, provided you can kill the driver or force him to exit the car. You can then get in and drive it around the world, or drive it back to a friendly base. Doing so will add the car to your garage collection, if you don't already have that car. Once added, you can pick that car from any friendly base any time you wish to venture out into the wasteland. You will be able to fast travel, but doing so automatically switches to your Magnum Opus. One benefit from using an enemy vehicle is this provides a faction-based disguise, unless you get too close to an enemy vehicle. This allows you to avoid conflict with enemy patrols of that faction, and also to drive much closer to an enemy base before they realize what's up.
One final subject that covers both vehicle and melee combat is fire. Some cars are equipped with gasburners or flamethrowers that will temporarily set your car on fire, dealing damage for a few seconds. The same can happen in different areas in the bases. There are often areas that are blocked off by a constant stream of burning gas, and if you make contact with it it will set Max on fire for a few seconds and deal massive amounts of damage. You can use this same principle on enemies, and either knock them into the fire or lure them into it.

Base Development

As you play the game, you will encounter a number of different bases led by friendly factions. You can perform a certain number of missions for them that will unlock special benefits for you, and you can also explore the map to find specific items which can be used in base development. For example, you might need four special items in order to build a water collection system. As water and food allow you to refill your health bar, having this system refills your water canteen automatically when you visit the base. You can travel to the locations marked on your map, pick up the items, and return to the base to build the system. There is a time limit on the frequency of refilling, however, so you can only refill your canteen about every 30 minutes.
Besides a water collection system, there are many others. For example, you can build a maggot farm to refill your health automatically, a clean up crew to collect any scrap from vehicles you destroy in the region, and a oil reserve to refill the fuel on your car.
Combat is impossible in friendly areas. These friendly bases are filled with NPCs who are immune to your attacks. Every other area of the game is considered hostile.

Inventory

Mad Max has an extremely simple inventory system. You always carry your shotgun, and you can pick up a limited number of shells and shivs to use in combat. Any scrap or ammo for your car weapons is automatically transferred, although like your shotgun, you have limited slots for your car weapons' ammo and cannot store any extra. There is no item management or even inventory screen.

Region Management

Each friendly base controls a region divided into several territories. Each territory has a number of minefields, enemy camps, convoys, sniper towers, totems and race locations. Completing races will unlock new cars for your base, while clearing the other challenges will reduce the threat in the region. Reducing the threat makes it safer to travel through the region, with fewer enemies spawned in as you drive around. Reducing the threat is also critical for unlocking certain upgrades, and advancing the story in some places.

Procedures

Complete a mission

These are relatively simple in structure, and usually involve killing a particular enemy or destroying a camp, or going to a location and finding an item. You might have to complete a race or speak with an NPC as part of the mission, but these serve to add spice. All missions advance the main story of Max's quest to get his V8 back, and eventually cross the plains of silence.

Scavenge

Scrap is critical for upgrading the bases and the Magnum Opus. You will collect a large amount of scrap by clearing bases, destroying enemy vehicles, and in the early game, by finding locations marked as scrap sites.

Eliminate a convoy

Enemy convoys are large groups of cars with one main vehicle being protected. These patrol set routes, and can be really challenging to take out, especially in the early when your Magnum Opus does not have much armor or offensive ability. Once a convoy has been eliminated, you can pick up an ornamental object for your car, and the threat level in the region will be reduced.

Clear an enemy camp

Camps come in several varieties. The main enemy camp in any region will house a "Top Dog," which will be a reskinned version of Scabrous Scrotus himself. They all fight in almost the same way, have the same animations, and can be tackled with almost the same strategy: bait them into charging, dodge, then wail. Rinse and repeat. There is very little variety here.
Another camp type is an extended brawl. You will face a number of groups from Stank Gum's Legion, and you just have to kill all of them. Two other camps are oil pump camps, and transfer tank camps. The objective of these is to destroy either the tanks or the pumps. You will also find a number of scrap items, ammo, food, water, and base parts for you to collect, and Scabrous insignia for you to destroy. These are optional, but with the exception of the insignia, all benefit you.
Camps have a number of navigational challenges or puzzles associated with them. You might have to lower a bridge whose winch is on the oppsite side, or you might have to locate the trigger to turn off a gas flame that is blocking your path. These serve to break up the combat challenges and add a bit of variety.
As a prelude to actually clearing the base, you can often speak with an NPC placed outside it who will give you extra information, such as defenses, what to expect inside, and secret ways in. Also, the bases often have different types of defenses: snipers, towers that launch grenades, flame throwers that block the entrance, etc. Similarly to the warcrier's effects on enemies, spending a long time with these defenses aware of you will increase a defense meter. Once filled, the defenses will become supercharged, dealing more damage and more actively attacking you.
As you continue playing, you will be dependent on these camps. After you clear them, friendly NPCs move in and take over, much like in the cleared villages in The Witcher III. Every 20-30 minutes, they will gather scrap that is deposited in your account for you to use however you want. Near the endgame, you will receive around 200-400 scrap at a time.

Clear a mine field

Mine fields are both interesting and somewhat annoying in this game. Unlike most games with mine clearing, the mines are actually invisible until detected. You need to use a special vehicle, Chumbucket's buggy, in order to detect them. The buggy has a dog, who you encounter and rescue from Chumbucket at the beginning of the game. The dog will bark and face the direction of the nearest mine, and when you get close enough it will be revealed for you to disarm. Although novel, there are two problems with the implementation of this mechanic. First, you cannot fast travel with any car except the Magnum Opus, so if you fast travel with the buggy from anywhere to the nearest fast travel option, you will automatically switch to the Magnum Opus, defeating the purpose of using the buggy in the first place. The second is the sheer number of minefields. Most territories have two minefields, and each minefield has between 2-3 mines. 14 territories times 2 minefields times 3 mines is 84 mines! To summarize, you'll have to drive around in a very weak and exposed vehicle to the minefield, assuming you have already located it, then slowly putter around listening to your dog bark and watching which way he is facing until a mine is revealed. While this is interesting the first few times, 28 mine fields is a bit much.

Complete a race

As mentioned before, sometimes completing a race will be necessary in order to progress the story. There are a few different kinds. One is simply to reach the finish line before anyone else, while another is a checkpoint based race: there are a number of lines of barrels set across the race track at different points, and at each line you must smash into one barrel before continuing.

Reveal a region

There are 11 air balloons scattered over the world map. Once accessed, these function as fast travel locations. Very often these will be guarded, and sometimes you will have to make the air balloon functional again. For instance, once or twice you will find one that needs to be fueled up, and there will be no fuel canister in the area, so you will have to use a spare from your car if you have one, or you will have to go and find one then return. Once up in the air, you can use your binoculars to reveal different locations on the map, and to reveal the name of the region as a whole.

Level up

Mad Max has a rather unique leveling system. Max has ten abilities, each with ten levels. In order to level up his abilities, you need to complete challenges. A challenge is basically set up as a condition: for example, collect 45000 total scrap in your playthrough, or defeat 10 Scrotus vehicles. Some of these, by their nature, are repeatable, like the second one. Others, such as completing all the base projects for all bases or for one particular base, can only be completed once. Each time you complete a challenge, you are rewarded with a Griffa point and an increase to your legend level as well. It seems that your legend level controls several aspects of the game: you can only get access to some upgrades for your car after reaching a set legend level, for example.
Griffa, it is implied, is one of Max's hallucinations. In order to level up your abilities, you must travel to one of Griffa's locations, which are marked on the map. There, he will engage in some dialogue, and then you may upgrade your abilities. These include increasing your health bar, receiving bonus water from water collection sites, increasing the amount of health you gain by eating food, gaining extra scrap when you collect it, using fuel more efficiently, and several combat related abilities, like increasing your damage with a melee weapon or making melee weapons last longer before they break.

Manage a base

In keeping with the Mad Max ethos, there is not much for you to do in managing a base. Unlike Metal Gear Solid V, you will not assign staff to different departments, nor will you need to make sure income is sufficient. All you need to do is collect the appropriate parts out in the wasteland, bring them back when you have them all, and build the project in the base. Besides the in-game benefits of doing so, it feels really satisfying to see each base progress from an absolute shit-hole to...well, not paradise, but a less shittier hole, at least.

Upgrade the Magnum Opus

At the beginning of the game, it will be quite basic and weak, but you can unlock rams, armor plating, new weapons, nitro boosters, and many more. Most of these just require scrap, but often have a game wide condition as well. This could be completing a story mission, or reducing the threat level in region below a certain threshold.

Weather a storm

Similarly to the massive sandstorm in Mad Max: Fury Road, sandstorms will frequently appear in different areas of the map. It is sometimes possible to evade them by driving outside their range, or even more simply by seeking shelter in a friendly base. These storms are dramatic and deadly. The sky darkens, lightening flashes down across the landscape, the normally quite soundscape is replaced by mad howling and blowing, you can barely see anything, and huge pieces of debris are whipped around which can lay Max out and kill him, and which (thankfully) only slightly damage the car.

Resources

There are a number of different resources.
  • Max's health: Self-explanatory.
  • Max's canteen: Holds a limited amount of water. You can collect this from water collection devices spread around bases and scrap locations. You can drink from this to restore some of Max's health.
  • Max's stats: Max has a number of abilities and stats that can be upgraded in different ways. Similar to the way that the Magnum Opus can be upgraded in the garage at any time, Max's gloves, jacket, shotgun, and fighting special abilities can be upgraded and unlocked using scrap. As discussed above, by completing challenges you get Griffa tokens, which you can take to Griffa's location and upgrade his health, etc.
  • Max's shotgun ammo: Really scarce, and useful in particular circumstances.
  • Max's Shiv ammo: Dito.
  • Car's health: Chumbucket will repair this automatically whenever get out and explore. Your car cannot be repeated while it is in motion.
  • Car's stats: Discussed above.
  • Car weapon ammo: Can be found in bases, and also replenished if you have the armory upgrades in a friendly base.
  • Region threat level: This is controlled by the number of threats in the region.
  • Base Upgrades: Discussed above.

Conflicts

The main conflicts in terms of game play are how you customize your car. There are a large number of trade-offs. Just as a few examples, let's say you want to build some kind of speed demon, so you max out the engine and exhaust, remove all the armor plating, and front ram. This gives you a light, fast car that will take damage very easily and probably not survive long in a tough fight. On the other hand, maxing out the speed also has a slight negative effect on the handling, so the greater your max speed and acceleration, the more difficult it will be to maintain a good course with such a car.

You could of course go the opposite way, maxing out armor, equipping the heaviest ram. This will make your car much slower, but more able to withstand and to deal damage. You can still have a powerful engine, but due to the weight of the armor and ram, it will be less effective.

For the story, of course the conflict between Max and the enemies is front and center most of the time. He wants his V8 engine so he can continue his insane plan to cross the non-existent Plains of Silence. But, there are a number of lesser conflicts. For example, whenever you level up, Griffa's dialogue speaks about how Max still has his humanity and his desire for friends and family, but Max repeatedly denies this, even as you the player make Max improve all the friendly bases and complete tasks to make their lives better. As the story progresses, it becomes clear to Chumbucket that Max sees him as a means to an end, and plans to install two large gas tanks in the back, leaving Chumbucket no place of his own. This leads to a short-lived conflict between the two of them.

Although never acted upon in the game, there are also conflicts between the different friendly bases. As you wander around them, the NPCs can be heard to say things like "I guess we're now trading with those assholes of Jeet's. I can't wait till we raid one of their convoys" or similar hostile comments.

One final conflict is between Max's goal and Hope. Hope is a slave/concubine that Max encounters in one of the friendly bases early on, and later takes on more significance as Max does a number of missions for her to rescue her daughter, Glory. Max initially denies his own humanity and attraction to her, but eventually risks his own life and his goal to help her.

Boundaries

The world map is surrounded by The Big Nothing, which takes the form of endless dunes and dramatic canyons (presumably once undersea valleys). You can enter this area for short distances but eventually you'll be forced to turn around.
As mentioned before, there are strict limits on inventory. You can only hold so much ammo for your shotgun and your car weapons, and the same goes for water. You can never carry food around: once found, you must either leave it, or eat it immediately.
There are also some limitations on car types. These are restricted to four-wheel vehicles, and only run the range of sedans, muscle cars, pick-ups, and beetles. There are no war rigs like in the movies, no motorcycles, etc.

Outcomes

There is only one basic outcome of the game. You have a final confrontation with Scabrous Scrotus in which he, the Magnum Opus, and Chumbucket all die. Hope was killed previously, as was her daughter, Glory. Max is on his own again, and he has Scabrous Scrotus's car in which to continue his journey.

After this event, you can continue to play the game and destroy enemy bases, complete races, etc. The Magnum Opus and Chumbucket are resurrected for this, which although very gamey, makes sense in terms of gameplay. After all, you can only make use of the Magnum Opus's weapons if Chumbucket is present, and without the weapons it is basically impossible to take down the defenses of a base, eliminate snipers, take down totems, etc.
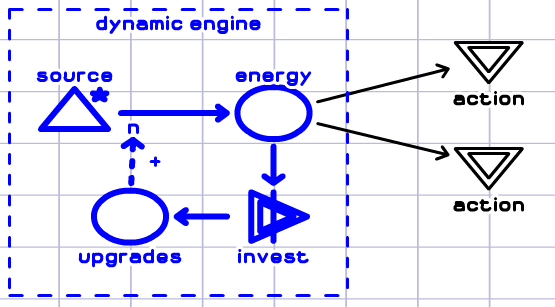
Dynamic Elements

Besides the elements discussed below, the world of Mad Max is itself somewhat dynamic. As you drive around, you have the chance to encounter Scrotus's patrols, and this probability is affected by the threat level in the region. There is also the chance to encounter a sandstorm, and this seems to be randomly triggered.

Dynamic friction is used in many areas. As you unlock higher and higher upgrades for Max's combat abilities, and for his car, the prices in scrap of course increase.

This manifests in the Fury Meter you have during combat. This is set on a timer, so it will inevitably empty and you will have to continue your combos in order to fill it again.

The main manifestation of this is the car customization. As mentioned before, you can create a large variety of cars that fit your play style.

The stopping mechanism is used to prevent the player from abusing the base upgrades and the Magnum Opus weapons. The weapons all have a limited amount of ammo, and there is a several second delay between uses of the weapons. As for the bases, there is a 20-30 minute delay between refill times.


Dramatic Elements

Characters and Story

The story does not follow any of the movies or other media exactly, but takes heavy inspiration from almost all of them, especially from the third movie and from the comic book series prequel to Mad Max: Fury Road. As an example, in Mad Max: Beyond Thunderdome, there is one character called Blackfinger, and in the game this is expanded out into a huge cult or religion of car worshiping mechanics whose fingers are of course black from working with grease all day.

Max has already been discussed at some length, as has his mechanic/blackfinger, Chumbucket. Other characters are Jeet, Deep Friah, Gut Gash and Pink Eye. These are the leaders of the friendly bases, and you can learn a little about them through dialogue and by completing missions. Crow Dazzle is the MC for the races, and for enemies you have Stank Gum and Scabrous Scrotus. We don't really learn much about the main villains. Stank Gum likes to wear people's skins, and Scabrous is just a big evil dude who took your car, and also happens to be one of Immortan Joe's sons. As mentioned before, the "top dog" enemies are all just reskinned versions of Scrotus, so there is very little personality there.
Last of all there are Hope and Glory. These appear to be non-canon versions of characters with the same names from the comic book series.
In terms of the actual story, while rich in lore and environmental details, the plot is very lite. Following being left for dead and having your V8 engine stolen, you quickly find Scrotus's dog, which Chumbucket is about to eat. Max saves the dog, and you and Chumbucket team up. Chumbucket agrees to be your mechanic in exchange for help finding parts for his Magnum Opus, a car that he is building and one which he attends to with religious and sexual devotion. To get the parts, you need to scavenge locations under the control of different groups of War Boys. Along the way, you will do missions for the leaders mentioned above, who will often give you information or weapons that enable your further progress.
Eventually,you will make it to Gas Town, compete in a race and Thunderdome style duel in order to get the V8, only to discover that Scrotus was still alive. He recognizes you, and you must fight him. This proves too much for Max, and Hope must rescue you. This triggers a number of missions to reunite Hope and her daughter, Glory. This also brings to a head the situation with Chumbucket: now that Max has what he needs, he no longer wants Chumbucket's company, and this triggers a break between the two. Max must leave to find Chumbucket, who has stolen the Magnum Opus. While Max is away, Scrotus and Stank Gum torture Chumbucket, and discover the location of Hope and Glory. When Max finds Chumbucket, Scrotus has already left, but Stank Gum is still there. Max kills Stank Gum, and returns to find Glory and Hope dead.
Chumbucket and Max team up one more time to kill Scrotus. After destroying Scrotus's convoy, you will have to use the Magnum Opus to push him over the edge of a cliff. Chumbucket refuses to leave the car, and so all three (Chumbucket, Scrotus, and the Magnum Opus) die.

Conclusion

Mad Max lacks a lot of elements that other open world games have. You won't find any animal skins to hunt and craft into holsters or pouches. You won't find any plants to collect and craft into medicines. You won't have any reputation tracking or a morality system. Nor will you be tasked with tracking down 11 different kinds of useless collectible objects. You will not be running out of energy and be forced to stop what you are doing to get some food, or suddenly become thirsty and need water, since this is not a survival game.
The main word that comes to mind as I wrap up this analysis is focus. Avalanche Studios has taken an iconic IP, and stripped it down to its barest essentials, and developed each one to the fullest. Mad Max, as a world, is about beating the shit out of bad guys and driving through a desolate landscape, and this game delivers that in spades. You get a great, although somewhat flawed, melee combat system, and you get great driving and vehicular combat. The story stays true to the ethos of the originals, and the design of the characters and world is excellent throughout. In terms of character and enemy design, my only bone to pick is with the lack of variety in the Top Dog Enemies.
Like a tough survivor out of the wasteland, Mad Max the game has been stripped of fat and is a lean experience. Even 5 years after its release, it remains a great play and a game well-worth your time.

Monday, January 4, 2021

Metal Gear Solid V: The Phantom Pain Analysis

Overview

Metal Gear Solid V: The Phantom Pain is a third-person open world action stealth game developed and published by Konami in September 2015. It is a single player game, with limited options for multiplayer.

Formal Elements

Players

In the game, you play as "Venom" or "Punished" Snake, and many characters will refer to you as Big Boss. You are the leader of a private military force, and you've just woken up after a coma of 9 years. You lost the lower half of your left arm, and you have a huge piece of shrapnel embedded in your forehead. You control Big Boss from a third-person perspective, but you can aim down the sights of your weapons in first person, and when you crawl through small spaces the camera also switches to this perspective.

You can play some missions as soldiers that you convert to your army.

Rules

Combat and Movement

As Big Boss, you get your left arm replaced by a robotic one before your first mission. You can thus use larger, two-handed weapons like rifles and rocket launchers. The movement system is limited to walking, running, crouching, crawling, and climbing on some surfaces. You can only walk or run up slopes of a certain angle, and this will lead to a lot of periodic frustration, as slopes that look climbable are sometimes not, and you will repeatedly slip down them. Crouching and crawling reduce your visibility, making it easier to sneak by enemies.

Most knee-high or wait-high ledges can be climbed over, and if there is a sharp edge or ledge, you can even jump up to head-high ledges. You can discover vertical cracks in many locations that can be crack-climbed.

Besides moving around under your own power, you can make use of a horse, D-Horse, different kinds of trucks, tanks, and later on, D-Walkers. There are two main maps, Afghanistan and Africa, in the game, and both are quite large and rugged. You can run from one area to another, but the maps are so large that it will take 5-10 minutes of sprinting. Vehicles function quite realistically, generating light and noise that will alert enemies nearby. They also have varying degrees of difficulty in traversing the rugged terrain. Vehicles take damage realistically as well, and if they take enough damage they will become immovable and eventually blow up.

There are two more ways of moving around. The first is by using your support helicopter. As you play, you will probably destroy enemy radar dishes which will unlock new landing zones. You can call your support helicopter to come and pick you up. Once you return to your aerial command center, you can pick an alternative landing zone closer to your goal.

Another way is by picking up shipping invoices at enemy bases. You can attach these labels to your cardboard box, if you have it equipped, and you can ship yourself from one enemy base to another using this method of "fast travel." This only works if you are at a shipping station, of course.

Moving on to combat, MGS V features both ranged and melee combat, but the primary focus is on stealth combat. As you attempt to complete a mission, you will usually approach an enemy base and do some scouting. You can use your companions to help you identify enemies and other points of interest, and you can also use a special scope to place markers or tag enemies. Although you are not punished for engaging in combat, there are a number of indirect costs. As you encounter enemies, you can take them out in a number of ways. For example, depending on which companion you have, you might be able to distract them, stun them, or kill them without getting your hands dirty. You can approach them in a stealthy manner, get behind them and choke them out. Once choked out, you could use your Fulton extraction device to send them back to Mother Base, kill them, and/or hide the body. You could use different weapons to eliminate them, either lethally or non-lethally. Depending on the weapon you use, this may alert other nearby guards. If you don't hide the body, it is possible that patrolling guards may find it, and raise the alert level of the base. If you draw your weapon and approach a guard, they will lay down their weapon and you can choke them out or pursue the other options outlined above. Besides choking an enemy out, you can interrogate them (provided you have an interpreter for the language) and get information about the base, high value targets, or valuable resources.

Depending on your stance, your camouflage, the amount of light, the surrounding shrubbery, the amount of noise you make, and even how smelly you are, you will attract attention. This is shown by a white fuzzy ring around your character pointing in the direction of enemy attention. This can make the enemy leave their post or abandon their patrol to investigate the area. If the amount of suspicion crosses a limit, the enemy will "detect" or "spot" you.

If an enemy spots you and no other enemies in this area have been alerted, you will get a brief period of "reflex time," where time slows down and you can quickly close the distance and choke them out, tranquilize them with your tran gun, or use another means of silencing them.

You can also go loud if you are discovered, or you can back off and try to hide. The base guards will try to find you based on your last-sighted position, as well as noises and suspicious sights.

As you interact with the bases, enemies will begin to adapt to your tactics. For example, many bases will begin to place land mines in strategic locations, enemies will begin to wear body armor or helmets, depending on your preferred target. If you mostly attack at night, more spot lights will be placed and enemies with night vision goggles will spawn in.

Base Development

As you play the game, you will extract soldiers, vehicles, placed guns, and resource containers using your Fulton extraction device. This starts out as a balloon that you can use only on soldiers, but you can upgrade it for placed guns, then for vehicles and resource containers, and through a hidden path, you can even develop a black hole version. Soldiers each have unique names, and random special abilities, as well as being ranked in categories like combat, base development, support, communications, medicine, and research. These soldiers can be convinced to join your private army, and they will contribute to the productivity and level of the section they are assigned to. 


Certain soldiers have specific traits that affect other staff, or that allow specific development options. For example, a staff member might have a "troublemaker" trait, which increases the chances of fighting among staff, whereas "diplomat" effectively cancels this. In terms of development, if you want to develop certain Fulton upgrades, you will need a soldier with "Transportation Specialist." There are close to 30 of these specialist traits.

In terms of staff contributions, if you capture a soldier with an A rank in research (as an example), you can assign that soldier to that section, and they will increase the level of that section, allowing you research more advanced weapons or equipment. Assigning a solider to base development effects the speed with which unprocessed resources get processed. As some technologies require a certain number of processed resources, this of course comes in handy. Alternatively, assigning a soldier to intel increases the number and accuracy of intel reports you receive when in the field. These could concern the placement of enemies, updates about the weather, etc. 


Each section has a limited number of positions available, and you must build dedicated base platforms for each section, and upgrade each one in order to expand the potential number of staff for each one. Each platform can be upgraded to level four, further expanding the staff limit of the section by 10 each time, except for the command platform, which increases the staff limit for all sections by 5. Each upgrade costs exponentially more money, time, and resources. If you want to go beyond these limits, you will need to purchase further FOBs (forward operating bases) around the world. Each FOB costs exponentially more "Mother Base" coins, encouraging the player to engage with the microtransaction system KONAMI has created.

Once purchased, the FOB works essentially the same as Mother Base. You must build a command center platform, and then you can build and upgrade platforms for the other sections. With FOBs, the exponential costs have been doubled down on, so each upgrade requires much more money, time, and resources than the one before it. It is not easier to acquire these, however, creating a strong FU feeling in the player.

You can travel to Mother Base and explore it, and you can also interact with the soldiers there. When a soldier sees you, it will raise their morale, making fights among staff less common.

Inventory

MSG V features a simple inventory system. The player may carry two main weapons, one rifle and one sniper rifle/grenade launcher/missile launcher. You may also have two secondary weapons, a pistol or SMG of some kind, and a modification of your prosthetic arm. You can carry 8 support weapons, and 8 items. Support weapons are items like different kinds of grenades, decoys, or mines, while items are things active camouflage, night vision goggles, or your phantom cigar, which allows you to speed up time until particular times of day. Your companions and vehicles also count as inventory items, and you may only have one of each at a time. If during a mission you need more ammo, you can call in a resupply drop, which acts like the reverse of a Fulton extraction: you get a box dropping out of the sky on a parachute to the location that you designated. As many players have noted, you can actually use this to knock out guards!

You can also request different vehicles, buddies, and weapons using this air drop system.

One point to mention about deploying to an area is that each item, weapon, vehicle, and buddy has a deployment cost. The higher the level of the item, the more it will cost you. This applies to the items you bring with you on the initial deployment, as well as those air dropped in during deployment.

You can equip any weapon or item that enemies drop, but this will cause you to drop your currently equipped item. So, for example, if I have a sniper rifle, but I want to take out a helicopter, I can pick up a rocket launcher that an enemy has dropped. Since sniper rifles and rocket launchers occupy the same slot, I will drop the rifle and equip the launcher.

Procedures

Watching a cut-scene

This is a Hideo Kojima production after all. There are cut-scenes in the game, although from what I understand they are somewhat restrained compared to previous Hideo Kojima titles.

Trading

Using your iDroid device, you can sell resources and items you have at your Mother Base. Unfortunately, and quite illogically, for the player, you cannot buy resources. This again is probably to force engagement with the microtransactions that KONAMI has created.

Complete a mission

There are 50 main story missions, and 157 side ops. The main story missions all open with a cut scene and voice over explaining the context and the goals, while the side ops are open world filler of the kind that Ubisoft made famous. The main missions are timed, and each has a number of hidden optional objectives. For example, you might be trying to extract a scientist, and to complete the mission you must of course do this objective. However, you might have a bonus objective of extracting him using the Fulton device in a particular way, or there might be an bonus objective to rescue a prisoner nearby, etc.

Completing the mission within certain time limits, without being seen, without killing soldiers, and without raising the alarm all give you bonuses, as do completing the optional objectives. The missions have a large variety of settings and optional objectives, and there are many twists that appear during story missions.

The side ops are a trash heap. As an example, you can clear mines from mine fields. This involves going to the location, and then walking around shooting the mines until the area is clear. There are 10 of these. Ten! Or, there are 16 side ops which ask you to eliminate groups of heavy infantry. These are heavily armored soldiers that are not vulnerable to most small caliber weapons. You can use tanks, missile launchers, or you may sneak up on them, choke them out, and Fulton extract them to your Mother Base if you deem fit. But there are 16 of these missions! The number of the soldiers is slightly different, and they are in different parts of the map, but it is essentially the same challenge. Then there are the missions about extracting a wandering mother base soldier, extracting a prisoner, extracting a valuable soldier, or eliminating tank or armored-vehicle units. All of these appear in double digit numbers, are repetitive, and quite boring after the first few in each group. They do provide a decent amount of GMP in the higher ranks, but you can still earn more passively doing combat deployment.

Manage Mother Base

Mother Base is where you can check up on your soldiers, take a shower, and raise the morale of your staff. Mother Base requires a lot of management, and the game does a great job of simulating this. You can view all your staff via a menu, and sort them according to various characteristics. You can switch their section, and you can even enter direct contracts with them or dismiss them. Direct contracts prevents them from dying, being abducted from FOBs, or being sent out on dispatch missions.

Besides this, you will be able to build new platforms to expand your military capacity and increase the level of your different sections. You can also begin different research projects to unlock new weapons and items.

Assign Combat deployment

Using your iDroid device, you can also assign different combat teams to take on combat missions. Some of these can counteract the AI's adaptation to the your play-style. For example, if enemies have taken to wearing helmets all the time, you can send some of your soldiers on a mission to destroy the enemy's supply of helmets, making it easier for you to play the way you've become accustomed to. 


Alternatively, you can send your staff on combat missions to recruit new staff members with certain proficiency, gather plants or other resources, or just to engage in different lucrative missions, such as protecting a VIP or contracting to keep the peace in some war-torn area of the world. These missions vary roughly lineally in difficulty, benefits, and time required.

Listen to music or interview

There are hundreds of tapes scattered throughout the map, and many can additionally be picked up automatically by completing story missions. These give the player the opportunity to hear extra information. Many of these are exactly the same as the mission briefing tapes, but there are still some interesting revelations.

Resources

There are a large number of different resources.
  • Health: Your avatar has rechargeable health like in many shooter games that came out after Gears of War. If you continue to take damage, you will eventually die, but if you can hide, your health will slowly recharge.
  • Staff: Your staff are an important resource that influences the power and efficiency of your private military organization. You can send the combat section on deployment missions to earn GMP, more staff, or resources. They can be killed during these missions, and other players can attack your FOBs and steal them from you.
  • GMP: GMP stands for gross military product, and it appears to be a kind of terminological joke by Hideo Kojima. It is the money in the game, and serves several purposes. First, you receive it as a reward for completing missions. You can spend it on base development, research projects, and on deployment to the two fields of operations.
  • Ammo: You can only carry a limited amount of ammo for each weapon at a time, but you can replenish this by walking over similar class weapons, finding ammo packs in a base, or by calling in a supply drop.
  • Vehicles: You eventually gain the ability to Fulton extract vehicles and bring them back to your Mother base, and you can then deploy with these during main missions and side ops.
  • Mother Base Coins: You receive a small number of mother base coins for each day you log in to the game, but this number is purposefully kept minuscule in relation to what you need to purchase in order to encourage microtransaction purchases. Fuck you Konami!
  • Private Force Points: Each day your soldiers will engage in in pitched battles against other players', and you will receive private force points for your victories. You can exchange these to purchase high-level staff, and different amounts of resources.
  • Weapons: Your weapons are critical resources. You need to consider the parameters of the mission and what you are likely to face, but you will probably develop a liking for a particular play-style revolving around certain weapons.
  • Plants: As you explore, you will find different varieties of plants growing in the world. When you pick them up, they get sent to Mother Base automatically. To increase the amount of plants you get more quickly, you can send your soldiers out on dispatch missions, or you can purchase them by exchanging PF points.
    • wormwood
    • black carrot
    • golden crescent
    • tarragon
    • African peach
    • digitalis purpurea
    • digitalis lutea
    • Haoma
  • Materials/Resources: There are several kinds of materials:
    • Common metal
    • Precious metal
    • Biological resources
    • Fuel resources
    • Minor metal
  • These resources can be acquired in several ways. You can often find small containers of the different metals and other resources around enemy bases. However, you will also find large cargo containers of the resources at enemy bases, which you can extract using your Fulton device after it has been upgraded enough.
  • Base Section Level: Each base section has a level, and this is controlled by the number and quality of the staff assigned in each section.
  • Base Section Platform Number: Each section can be upgraded to four platforms in one base.
  • Number of Bases: Besides Mother Base, you can purchase offshore waters in which to build FOBs. These allow you to build more command, intel, research, etc platforms and continue to increase the section level and hire more store, potentially unlocking more research options. As mentioned before, additional FOBs are purchased with Mother Base coins, which are extremely limited. You get 15 per day, and buying an additional FOB location might cost over 1100 coins. Again, fuck you Konami.

Conflicts

There are a number of interesting conflicts going on in MGS V. For one, there is the conflict between being stealthy and going loud. It is possible to complete the game without killing anyone, for example, and instead always using a tranq gun or other non-lethal means of subduing them. If you traq an enemy, you can Fulton extract them out to Mother Base, where they will become one of your loyal soldiers. This provides a diagetic motivation for at least not killing everyone. You also receive post-mission bonuses for being non-lethal, and for maintaining perfect stealth. However, the game is much, much easier if you occasionally kill soldiers, and if you allow yourself to go loud.

There is also a conflict between continuing and developing your preferred playstyle, and the AI system's continuous adaptations to that. If you really like taking headshots from a distance, the enemies will start to wear helmets, and later on full body armor with face-plated helmets. It is still possible to eliminate these soldiers with headshots, but it requires extreme precision and timing in the former case, and anti-vehicle sniper rifles in the latter.

Boundaries

There are strict inventory limits. As discussed before, you can only have one rifle/SMG/shotgun and one larger two-handed weapon equipped at a time. This, together with ammo limitations, serves to restrict your playing options in interesting ways. Of course, it is possible to pick up an enemy's weapon, and to request a weapon air drop, but these are not always feasible in the heat of the moment.

Outcomes

Like many open world games, there is no definitive end to the game. However, if you complete the main story missions, you will destroy the main villains and prevent their plans for world destruction/domination from reaching fruition. The mission called The Truth, however, turns all this horrifying on its head, but more on that later.

Dynamic Elements

The dynamic friction pattern appears pervasively. In terms of base section level, it takes more and more staff at higher and higher competencies in order to increase the level of the base section. This requires a large number of FOB bases, each of which costs exponentially more than the previously purchased one. Building the platforms and upgrading the platforms in each FOB requires exponentially more time, GMP, and resources. Just as a small example, in terms of time, the first upgrade in Mother Base takes about 30 minutes of in-game time. When you upgrade one of the platforms to level 2 in your second FOB, it takes 6 days! That's a 288X increase in time cost.

Besides the cycle of night and day, there is a cycle in terms of tension. When you are out exploring, the tension is typically low. As you get closer to an enemy outpost, the tension will increase some, and if you are proceeding with a mission, it will ratchet up accordingly as you try to avoid detection.

The playstyle reinforcement pattern appears in a negative form in the fact that enemies in bases react to how you infiltrate them and how to eliminate them in order to guard against you. Instead of encouraging the player to stick to the same tactics, you are forced to explore the play space and try alternatives to the same strategies. In its positive form, if you prefer to play in a loud, aggressive way, you can use your resources to research more assault rifles, grenade launchers, etc. When you clear out a base, you can then Fulton the resources back to Mother Base, allowing you to unlock more aggressive research options.

The worker placement pattern appears as literally assigning staff to different sections and receiving benefits based on the assignments.

The trade pattern appears in a limited way. As mentioned before, you can only sell resources to receive GMP, and never buy them using GMP. If you want to buy resources, you need to purchase them using real money. Fuck you, Konami.

The converter engine appears in a few forms. First, and most obviously, the number and level of platforms in a particular section determine the productivity and effectiveness of that section. In particular, the base development section takes unprocessed resources and converts them to processed ones. The rate at which it does this is controlled by how advanced the section is, so you can control the efficacy by your investments.

The stopping mechanism appears mainly in the form of boundaries and limits on marking soldiers, time limits for supply drops, and limits on your mission rank based on your equipment and helicopter support. If you equip the stealth camouflage, which effective makes you invisible for short periods of time, you are restricted to A rank or lower for that mission.


Dramatic Elements

Characters and Story

Upon escaping from the hospital where you were held, you are flown to the Seychelles where remnants of your force have created a "Mother Base," which looks like an oil rig or drilling platform. You are fitted with a prosthetic arm to replace your lost left arm, and one of your companions, Ocelot, tasks you with rescuing Lt. Kazuhira Miller, also called Kaz. He is being held prisoner in a Russian military base in Afghanistan. Upon rescuing him, you will be given further missions relating to the incident shown in what is called the playable demo to Metal Gear Solid V: The Phantom Pain, Metal Gear Solid V: Ground Zeroes. In this playable demo, you infiltrate an XOF (the counterpart to the FOX group that Snake belonged to) base and make some discoveries, following which the mother base you had been building in the Caribbean is destroyed by XOF. Your helicopter is blown up, and you suffer from grievous injuries, resulting in the 9 year coma you awaken from at the beginning of the game.

Miller thirsts for revenge, as his dreams were destroyed, and he lost both an arm and leg to torture. The rest of the game plays out with you basically running errands for Ocelot and Miller in Africa and Afghanistan in order to gather more information about XOF, who is leading it, what they have been doing in the 9 years since they destroyed your base, and what they plan to do now. As a first time player to the Metal Gear Solid franchise, it is really, really fucking confusing. Although this is the last game released, it happens roughly in the middle of the chronology of this game universe.

  • 1964 - Snake Eater (Released in 2004)
  • 1974 - Peace Walker (Released in 2010)
  • 1975 - Ground Zeroes (Released in 2014)
  • 1984 - The Phantom Pain (Released in 2015)
  • 1995 - Metal Gear (Released in 1987)
  • 1999 - Solid Snake (Released in 1990)
  • 2005 - Metal Gear Solid (Released in 1998)
  • 2007 - Sons of Liberty (Released in 2001)
  • 2014 - Guns of the Patriots (Released in 2008)

As you complete these missions, you learn about several different plots revolving around parasites, both parasites that live on the skin, and ones that inhabit the vocal chords. The vocal chord parasites appear to be part of a plan to either eliminate all languages except English, or perhaps to eliminate only English. Different people say different things at different times. The skin parasites have been used to create two units called Skulls, a stealth Skull unit, seen below, and a combat Skull unit. They will appear at several points throughout the game to increase the tension and difficulty of a mission. There is also a plot about metal gears, the large bipedal robots that give the series its name.


To spoil the game a bit, as you continue playing story missions, you will eventually unlock a mission called "The Truth," in which you learn that you are not actually Big Boss. Although you played as Big Boss in Ground Zeroes, when you wake up in 1984, you are the medic on the helicopter. Essentially, you've been brainwashed into believing that you are Big Boss, besides undergoing cosmetic surgery to alter your appearance to match that of Big Boss. Ocelot and Miller are both aware of this, and this ties into the events of the first game in the franchise, Metal Gear, released in 1987. In that game, you play as Solid Snake, who receives orders from someone who we can presume to be the real Big Boss. He orders you to infiltrate a base called Outer Heaven and destroy a metal gear. Eventually, you will discover the leader of Outer Heaven to be Big Boss...but this Big Boss is actually the body double that you play as in The Phantom Pain. For some reason, Big Boss has decided to take out his body double. Although it might make sense in some way, in general the story is really overly complicated and does not stand up well to close scrutiny. 
 
To return to analyzing the story of MGS V, it essentially tells the story of you, the player/medic, becoming Big Boss, who is the villain of the next game! So, it turns this fantasy on its head, saying, "You want to be like Big Boss? Here you go. By the way, you realize he's an evil fuck, right?" Even the way that you recruit new soldiers is highly morally suspect. You kidnap these people, then torture them and brainwash them to believe in the Diamond Dogs private military force. These people become your staff!

Besides this reversal, there are not at all subtle references to literature which further establish these themes. Your helicopter is named the Pequod, and in the beginning, the patient who helps you escape the hospital says to you "Call me Ishmael," the famous opening line of Moby Dick. There are also times when you are called Ahab, although it might be more appropriate to name Miller Ahab, as he is one who is driving the thirst for revenge throughout the game. Still, both the game and the book show how a good leader and man can become twisted into something evil by the pursuit of revenge.

A more general reference is the year when the story happens, 1984, after the famous book by George Orwell. As you can tell from the byzantine descriptions above, the game definitely deals with complex political arrangements, where things are bluffed, double bluffed, and there always seems to be another layer underneath, where the truth can be found.


Conclusion

There are a lot of gameplay and UI design choices at work in The Phantom Pain that are similar to those of Red Dead Redemption 2, and they produce similar effects. If you want to leave a combat area and return to Mother Base or your helicopter, you must pick a landing zone, wait for the helicopter to arrive, get in, and wait for it to depart. These are rendered in real-time/in-engine, and the camera is under your control while you are waiting for the helicopter to depart. You may even switch from one side to another and use a minigun to fire at enemies. But it still takes too much time. Yes, it adds in realism and atmosphere to the experience, but why does it require so much work and so much real world player time investment? Why can't you just Fulton yourself out? Similar choices regarding how you search cupboards in Red Dead Redemption 2 come to mind, where you must hold a certain button for longer than a second to begin searching, then hold a different button for longer than a second to pick up a single item, wait for the animation to finish, then hold it again to pick up a second item, etc.

While the systemic effects of sight, sound, smell and the enemy AI produce interesting stealth game-play, and the way that Mother Base management, research progress, and the Fulton extraction of resources and soldiers all interconnect produces great synergy, there are many areas where the design seems purposefully against the player. The main instance that comes to mind is the higher research items, which require extremely high section levels, GMP, resources, and time to unlock. These balancing choices effectively force the player to either grind away for hours and hours, or to give in and buy Konami's in-game currency. When player's have already invested $80 for a full game, it seems piratical to ask for even more money in this way.
 
I don't want to come off as too negative in this conclusion, however. Hideo Kojima and his team of designers, artists, and programmers have produced one of the greatest open world games with a strong focus on stealth, and intimately interlocking gameplay systems. I've completed the main story and many dozens of side missions and dispatch ops over two complete playthroughs, one in 2014 and one in 2020, totaling about 171 hours of play. I quite enjoyed both my playthroughs, and I would not rule out playing it a third time in the future. The game's graphics have aged relatively well, and the gameplay is as sound as ever. It truly is a masterpiece.


Thursday, September 10, 2020

Mount and Blade 2: Bannerlord Analysis

Overview

Mount & Blade 2: Bannerlord was released as an early access title on March 30th, 2020. It was developed and published by TaleWorlds Entertainment, an independent game development company based in Turkey. It is a hybrid game that features elements of simulation, role-playing, and strategy.

Formal Elements

Players

Mount & Blade 2: Bannerlord's main campaign is single player, but there is a multiplayer battle mode available.

The single player campaign sees the player create a character. You must pick a starting culture, gender, name, appearance, and backstory divided into different lifestages. The culture and backstory strongly influence how you will play the game, as your culture provides different bonuses and alters what backstory events will be available. These backstories in turn provide different starting bonuses to your stats, skills, traits, and renown. Since you can more easily level up at lower levels compared to higher ones, it will become more and more difficult to level up skills as your character level increases. You can control your character either from first or third-person perspective, although the campaign map can only be viewed from a top-down view common to many strategy games.

Unlike most other strategy games, the campaign map automatically pauses when your character is not moving or taking another action, such as raiding a village or besieging a castle or city. This mechanic is the same as the original Mount & Blade, but will be familiar to other players from the more recent first-person shooter/puzzle game, SUPERHOT.

Rules

This is going to be a long section. Mount & Blade 2: Bannerlord tries to simulate and capture a lot of different aspects in their game, and this leads to a complicated and intertwined rule set.

Combat and Movement

Let's start with the basics. When you are in a town, village, or on a combat map, you use the WASD keys to move around as in most FPS or TPS games. Your mouse will control where you are looking, and space bar can be used to jump. So far, so good, right? In towns and villages, you will not be able to attack anyone, except in special circumstances.

Combat revolves around the title of the game: mounts and blades. You can either use a horse to gallop around the map, or you can run around on your own two feet. Horses provide a huge boost to mobility, but they also penalize your attacks somewhat, and some weapons are not available when mounted. They also make you harder to hit if you remain moving, and you can use them to charge foot soldiers, dealing damage to them just by the impact of the horse's body. The damage of your weapons are also strongly influenced by the speed you are traveling at, so horses can greatly amplify this. Certain polearms can be "couched" when your horse reaches a high enough speed, allowing you to lock it in place and deal a massive amount of damage during a charge.

You can use a large variety of medieval weapons: one- and two-handed swords, maces, and axes, bows, crossbows, daggers, throwing weapons such as knives, axes, and javelins, as well as different polearms. Bows, crossbows, and throwable weapons work much as they do in other games: you must click left mouse button to ready your attack, and then you must take aim, taking into account that gravity will draw your projectile down the further away your shot is. You have a limited amount of time before your arm begins to tire and you must either cancel the shot, or take your chances with a wild one.

The melee combat is based on a 4-axis scheme: up, down, left, and right. You click and hold the left mouse button to initiate an attack, and then you drag the mouse in the direction you wish to attack. Up leads to high attacks, a vertical chop. Left and right lead to slashes, and down triggers a stab or thrust. Releaseing the button triggers the attack animation. Blocking works the same way, although carrying a shield somewhat mitigates the need to match your enemey's attack direction. If you are using a two-handed sword, and your enemy attacks from the top, you need to block using the right mouse button and dragging up. Otherwise, if you are in range, the attack will pass through your guard and deal damage. One caveat is that not every weapon has every attack type. For example, thrusting polearms are never used for slashing, so left/right/up/down all play essentially the same animation. Maces and axes also feature restrictions: they cannot be used for thrusting.

Although dirt simple, this system provides much of the draw for combat in the Mount & Blade series. Complex feints, dodges, and parries are possible when those 4 attacks and 4 blocks are combined with your character's movement. You can also kick or shield bash using F. Some weapons can also be toggled between a one-handed and two-handed mode using X, but this alters their damage and speed profile.

You can fight until you run out of health. There is no stamina system limiting your attacks or your movement, so you can spam the attack button as much as you want, although this will often lead to your death, as enemies take advantage of your recovery to clock you with a mace or rock. Should you die, your fate will be determined by the context of the battle, which will be discussed in the next section.

Battle

Combat in Mount & Blade takes place in set circumstances. It must be triggered by a particular dialogue outcome with an NPC, whether in a town or out on the campaign map. If you have other characters in your party, they will join you in battle. This is where the RTS elements enter. During battle, you can give commands to your party members based on numbered hot keys. By default, companions and infantry are set to 1, archers to 2, cavalry 3, and horse archers 4. There are further categories of skirmishers 5-6, and others, but I personally found I rarely used them. Commands are relatively simple, but powerful. You can indicate that a group of soldiers should advance, retreat, hold/travel to a position, charge, face a direction, take a formation (such as tight, loose, circle, wedge, etc). Mounted troops can be forced to mount or dismount, troops with bows or throwing weapons can be ordered to fire at will or hold their fire. If you prefer not to worry about all the details, you can delegate command to troop sergants, who will issue commands to each category of troop. Again, while simple, these commands add a whole layer of depth to combat, as you could command from the front as Alexander the Great, or stay aloof and issue your commands while staying out of direct combat. You could even do a mix, ordering positions and formations, then entering the fray yourself for a time. Flags indicate the position that troops will take, and which troops are currently selected.

You can only enter a battle if your character's health is 20% or higher.

Any character in battle can be killed or wounded. If the character is wounded, it will eventually heal after the battle and return to full health. If the character is killed, it is removed from the game permanently. You can turn this feature on for companions, but by default companions and named NPCs cannot be killed in battle. If you fall in battle and your troops are all killed, you will be captured by the enemy and you will have to bribe your way out, wait to be ransomed, or wait until your character escapes (after a random time). Most of your inventory will be gone, and your companions might have escaped before you, or they may still be prisoners. If you were attacking a bandit camp, your troops will drag you out and you will be able to heal and try again later.

Inventory and Party

The inventory system is basically a weight based system. All items have a weight and take away from your carrying capacity. Mounts and soldiers increase your carrying capacity, so for example, when you are by yourself and you have one mount, you can usually carry about 30kg, while an army of 150 troops, with about 50 spare mounts might be able to carry 5000-6000kg, depending on the exact type of mounts. You can exceed your carrying capacity, but this drastically reduces your campaign map speed. Why would you need to carry so much, you might ask? Well, there are a lot of reasons. One is that you will probably spend a large amount of time fighting bandits or other lords' armies, from which you will receive a lot of loot. And I mean a lot of loot. So much so that by the mid or late game, you will not be able to sell all your unwanted loot in a single town. You will receive 20,000 or 40,0000 denars, which will clear out the town, and you will have to travel to another because you still have a ton of junk. And you need the money to pay your soldiers.

That carrying capacity will also come in handy to feed your soldiers, and to trade, should you decide to do so. Your soldiers need to eat, and you need to carry enough food to feed them. If they don't get enough food, or if you can't pay them, they will desert and leave your party.

Regarding your own personal inventory, and your companions, you can hold four different weapons at any given time, although bows and arrows are counted as separate, so you need two slots for a bow/crossbow to be effective. Your armor is divided into head, shoulders (no, not knees and toes, fuckwad), chest, hands, and feet. Because these areas are different in terms of hit detection and intrinsic damage resistance, you need to prioritize good armor in vulnerable places. The head, of course, is a smaller target than the body, but it leads to quick fatalities, while the body still offers a lot of damage and a much larger target. The arms and legs can receive fatal wounds, but the probability is much lower. Your personal mount and saddle also occupy their own equipment slots. Lastly, there is a "civilian" tab in your inventory, which allows you to select clothes for when you are walking around towns and villages. As of June, 2020, there is no effect of these civilian clothes, besides their armor ratings, by which I mean that different factions will not respond to you based on what you are wearing, nor will different groups, such as commoners, criminal gangs, and nobles respond to you based on your clothes.

OK, time to dive in to discussing parties. Your party consists of yourself (the party leader), your companions, your troops, and your prisoners. Your companions are special NPCs that you can recruit from taverns around the game world. They have different backstories, cultures, appearances, starting inventories, attributes, and skills. They can contribute to your party/clan in many different ways. You can assign them roles such as engineer, surgeon, quartermaster, etc, which then makes them responsible for sieges, healing troops, and feeding troops, respectively. This means that they will gain experiences points for completing those actions, and also that their skill in that action controls its success and speed. Having a surgeon with 200 skill in medicine, for example, means faster healing compared to a surgeon with 50 skill in medicine. Companions can also be sent out on quests, provided that they meet the requirements. This allows you to take other quests yourself, and expands the rate at which you generate gold, positive relationships with others, and renown. You can also have companions form their own parties or trade caravans. Parties can be called on if you declare war and need additional soldiers for your army, while trade caravans travel from city to city and generate a fluctuating amount of gold. There are two more benefits or uses to mention. First, you can assign them as the governor of fiefs you own, increasing their efficiency and utilizing whatever special governor bonuses the companions have. Second, depending on their combat skills, they can make a powerful addition to your army. Having a master archer with a high tier bow and arrows equipped, or a two-handed weapon master with tier 6 long sword might not turn the tide of battle by themselves, but they can certainly help.

Like your companions, your troops are also recruited, but they will likely come directly from cities and especially from villages. If you have a high positive relationship with the elders of a village or the influential NPCs of a city, you will have access to higher tier troops, but without that leg up, you can only recruit the more basic tiers. Each culture in the game world has a different troop tree, and there are several special troop trees based on unique factions and starting troop types. As they make kills, they will receive experience and level up, increasing their armor and weapon quality, as well as their attributes and skills. Unlike your companions, your troops can be killed in battle, so you need to think carefully before attacking another army or besieging a city.

Lastly there are prisoners. When you wound an enemy in battle, they become available to take prisoner. They can be ransomed at a tavern, or if they are below tier 5, you can wait and you might eventually be able to recruit them. Noble prisoners can either be released or taken prisoner, and once captured, they can be executed or ransomed. Be careful about executions, as this has a massive impact on relationships with their clan and faction.

Skills and Attributes

Nope, we're still not done talking about the rule systems. Bannerlord has six attributes: Vigor, Control, Endurance, Cunning, Social, and Intelligence. Each attribute influences your learning rate for three skills.
  • Vigor: influences One-handed weapons, two-handed-weapons, and polearms.
  • Control: influences bow, crossbow, and throwing weapons.
  • Endurance: influences riding, athletics, and smithing.
  • Cunning: influences scouting, tactics, and roguery.
  • Social: influences charm, leadership, and trade.
  • Intelligence: influences steward, medicine, and engineering.
Each NPC and player character increases these skills in the same way: by engaging in actions linked to the skill. If you want to increase leadership, you need to lead a large army and maintain high morale in your armies. Medicine skill is increased both when troops are wounded and when you heal them, whereas riding is increased by riding a mount at high speeds and doing damage while mounted, in addition to simply having a mount equipped while moving around the campaign map. You get the idea. This is the same system, essentially, as The Elder Scroll Series. Thus, every skill has its own XP gauge, and every 25 skill levels, there is a perk you may unlock. Sometimes these are singular, but for others there are choices. For example, you may have to choose between increasing every party members' XP by a small amount each day, or increasing tier 1-2-3 troops' XP by a medium amount each day. Your character's level is also determined how many skill-ups you receive. To go from level 3 to level 4, you need to receive 15 skill-ups, while going from 13 to 14, you need 65 skill-ups. You receive a focus point every time your character levels up, and every three level ups you receive an attribute point as well. Let's cover focus points first. Each skill has 5 slots for a focus point. Adding a focus point to a skill increases your learning rate and learning limit for that skill. So, effectively, if you receive 50XP in smithing, but you have all 5 focus points invested in it, and have an endurance of 5, your XP might be multiplied by 11, giving you 550XP. Both attributes and focus points have this multiplicative effect, but attribute points have a more pronounced effect. Both attributes and focus points influence your learning limit, and this is an additive operation. You can level up beyond the level limit for any skill, but your leveling will be much slower. It appears that the multiplicative effects are cancelled out beyond the learning limit. Much like other RPGs, the amount of XP needed for each successive level increases. Because of the rarity of attribute points, and the previously mentioned fact that you level your skills more slowly as your character level increases, it is important to pick your character's backstory carefully to get the attribute points you need in skills important for your playthrough. If you plan on being primarily a trader, you need to get a lot of points in social to begin with.


Crafting

Crafting is a new addition to the Mount & Blade series. In the base game, only weapon crafting is allowed. To craft an item, you need to have all the required materials available, and you need to have its parts unlocked. In the beginning, you will have only a few basic parts for each weapon unlocked, and some weapons may be totally out of your reach because of this. As you perform blacksmithing actions, your skill will increase and you will also unlock new parts. These appear to be random. To craft a one-handed sword, you need a blade part, pommel, guard, and handle. These exist in many different forms, and can be mixed and matched freely. Other weapons have different part categories. Each part has different ingredients, and so slightly alters the necessary materials. They also modify the attributes of the weapon, its swing speed, attack damage and type, cost, weight, etc. Once a weapon has been crafted, you can name it anything you want. Blacksmithing actions drain a special resource that you can replenish by resting in a town or village. You can also dismantle unwanted weapons into their parts, which also gives you a chance to unlock new parts.

Questing

With the exception of the main quest, questing in Mount & Blade 2: Bannerlord works much the same as in Mount & Blade: Warband. There are village elders in each village, shop owners and gang leaders in each city, and hundreds of lords and ladies belonging to each faction to be found wandering the map, in castles, or in cities. These NPCs will randomly generate a problem for the player to solve, which will persist for a certain amount of time whether you accept them or not. Once accepted, you usually have a limited amount of time to complete them. Village quests include training troops, protecting the village from extortionists, giving a village leader access to another village's grazing land, rescuing a village leader's daughter, solving a family feud, delivering a good to a city NPC, and others. City quests include supplying goods to an artisan, selling the artisan's goods somewhere else, escorting a caravan, supplying weapons for a gang leader, attacking a rival gang, rescuing a henchman, removing poachers, and others. Noble quests include tutoring a noble, finding a spy, supplying advanced troops for a garrison, and others. If you fail one of these quests, your relationship with the quest giver will decrease, leading to reduced troop recruitment options and a chance that the NPC might not trust you with another quest in the future. Completing quests allows you to improve your relationships with NPCs, which can lead to better troop recruitment, more quests, money, and renown.

Relationships

As you meet NPCs, you will begin to form relationships with them. Attacking an NPC will cause them to be hostile to you, as will laying siege to one of their fiefs. Completing quests for them and giving them gifts are early ways to increase your relationships, and as a vassal or a lord/lady, you will be able to vote on who receives fiefs and on whether to adopt certain policies. These offer other ways to modify your relationships. You can also court NPCs of the opposite sex, get married, and have children, who will age and one day take your place if you die. As one last point, your relationship status with NPCs will also affect what castles you can enter. If you have a neutral or positive relationship, you will be able to enter, but if your relationship is negative, you will be barred from entry.

Procedures

Completing a quest

Completing a quest could involve a wide range of activities. For sake of illustrating the variety, I will use three examples. First, you might have to make a delivery. The quest giver will give you a number of items, perhaps, wool, horses, cows, or iron, and you have to physically travel to the target NPC and hand them over. Once there, you also have the choice of keeping them instead. Second, to train a noble. The noble who needs training will join your party. You may assign them to different roles just like other companions. They will remain in your party until the time is up or until they have leveled up 60 times. They will join in combat and any other activities you do. Last, to take care of a troublesome company. The company will join your party, and begin stealing things from your baggage train. You must travel to different nobles and find one who is willing to hire them. To do this, you will need to pass different speech checks based on your honor, tactics, etc.

Trading

Trading will get you a lot of money if you are observant and if you invest attribute points into it. You can buy resources from one village and sell to a city at a higher price, you buy a resource which is in excess at one city and sell at another where it is in high demand. This will net you a profit and increase your skill level in trade. You can also simply sell your loot from your battles. This will give you money, but no experience, since you did not pay for the goods.

Leveling up

As mentioned before, leveling up is triggered by getting the required number of skill level ups. You will then have to choose how to invest your focus point, and your attribute point if received.

Talking to an NPC

You will need to speak with an NPC in order to complete most quests, in order to receive quests, and also to barter. Depending on the subject of conversation topic, there may or may not be skill checks. For example, if you are trying to get married, there will be several skill checked conversations with your potential partner which you must pass before they will accept you. Or when you try to convince a noble to join your faction, the same will happen.

Lay siege to a city or castle

Sieging a castle or city is a quite involved process. You will first have to make a siege camp, which might take a few days depending on your engineering skill. Once you have a siege camp established, you could immediately launch an attack, or you might spend more time building siege engines such as ballistas, manganols, battering rams, and trebuchets. Once these are constructed, any siege engines that the city or castle has will attack your siege engines. To avoid this, you can put them in reserve and return them to the active state once more are completed. This way all of them can concetrate their attack. When you begin the attack, you will have the chance to place your troops in different positions before the chaos ensues. You can command your soldiers as normal, and you can interact with the different siege engines you have placed. Climbing the siege ladders, or storming the gates are tense and exciting parts of the game.

Clear a bandit hideout

When you clear a bandit hideout, you will spawn on a small combat map with some of your party members. You must kill all the bandits there, and once you do, a final boss group will spawn in. You can duel them or attack as a group.

Resources

  • Health: Your health always starts at 100 points, and you may invest in certain perks which increase it slightly. If it drops to 0, you will be knocked unconscious.
  • Age: Your character's age will increase in time with the passage of days and years in the game.
  • Character Level: Your character level increases as you get more skill ups.
  • Perks: Perks are unlocked for each skill once you reach the necessary skill level.
  • Attribute Points: Attribute points determine how quickly you level up.
  • Skill Levels: Determined by the amount of XP you have earned in the skill.
  • Focus Points: You receive one each level up. These are used to increase the learning rate and limit for a skill.
  • Skill XP: Determined by the number of times you use the skill.
  • Influence: You only receive this if you are a mercenary, vassal, or a leader of a faction. You can spend this on giving different fiefs to your nobles, instituting policy changes, or summoning armies.
  • Renown: You can this for completing quests, winning battles, and tournaments.
  • Money: This is in units of denars.
  • Inventory Space: This is determined by the number of troops and horses that you have.
  • Companions: As you increase your clan level, you will increase the number of companions you may recruit.
  • Food: You can buy this from various vendors, or pick it up as loot from defeated parties. Having a larger variety increases party morale.
  • Trade Items and Materials: Your parties will not consume these like food. These are items like wood, tools, leather, wool, iron, steel, etc. You can either trade them at cities, or in the case of material, you can get them by dismantling weapons.
  • Weapons: These can be bought at vendors, crafted, or picked up from battle.
  • Armor: These can be bought at vendors, or picked up from battle.
  • Mounts: These can be bought at vendors, or picked up from battle. They increase your travel speed, and allow you to move around the battle field more quickly.
  • Fiefs: Once you become a vassal or a factor leader, you can have fiefs and also assign fiefs to nobles in your faction. You will receive taxes based on the number of fiefs you have, their sizes, and their productivity.
  • Workshops: You may buy workshops in any city that you are friendly with, but if you declare war on that faction, you may lose that workshop. These generate money every day.
  • Parties: Similarly to companions, the number of parties you have will increase based on your clan level. You can assign a companion to lead a party, and in cities you can create a special trade caravan party, which will only travel and engage in trade.
  • Party Morale: The higher your party's morale the more likely they will continue to fight.
  • Clans: Besides your own clan, you can recruit any number of clans into your faction.
  • Clan Level: This is primarily a function of your renown. It will effect your marriage prospects, party size, number of party limit, and number of companion limit.
  • Movement Speed (Campaign): This is a complex calculation based on the number of mounts, troops, prisoners, wounded, and of course your inventory burden.
  • Movement Speed (FPS): This is determined by your athletics skill if on foot, and by your horse speed if mounted.

Conflicts

Leveling

As mentioned before, because of the slow pace of leveling later on in the game, it makes sense to stack your character's social and intelligence attributes as high as you can from the character creation menu. Your combat skills will still increase much more rapidly early on simply because you use them more often in the early game. As you level up, however, you will need to decide how to spend your attribute and focus points. As focus points are more plentiful, and skills only have five focus point slots, it is quite easy to get all five slots filled on the key social and intelligence skills, like steward, leadership, tactics, trade, and charm. Even though they occur more often, you still need to pick carefully. A much more important and impactful choice is that of attribute points. You only get one every 3 levels, and these have a big influence on your playstyle.

Boundaries

Inventory

There are no hard limits to inventory, but inventory weight is limited by the factors mentioned above.

Map

You cannot go outside the map boundaries.

Attributes, skills and focus points

Each attribute can have a maximum of 10 points, while skills can go up to 330. Each skill can have a maximum of 5 focus points.

Companions and Spouses

You can only have 8 companions, and you can only have one spouse at a time.

Outcomes

There is literally no ending for Mount & Blade 2: Bannerlord. Like Mount & Blade: Warband, the game can always be continued. In one of my playthroughs for Mount & Blade: Warband, I created my own faction and decided to conquer the world. It took about 70 hours, but I was able to bring every castle and city under my control. In Bannerlord, you can remain as a mercenary forever if that is your wish. You could never join any faction, and instead play as a merchant, buying shops, creating trade caravans, etc. You could become a vassal of a faction and help them paint the map one color, or you could start your own faction and try to do so yourself.

Dynamic Elements

There are many dynamic elements in Mount & Blade 2: Bannerlord. For starters, the dynamic friction pattern can be found in many design elements of the game. In increasing your skills, you need increasingly more XP for each level up. For each character level up, you require increasing more skill level ups. For each increase in clan level, you need more and more renown.

The slow cycle also appears in many different places. After a tough battle, you may have suffered from losses. You can recruit refresh troops from nearby villages or cities, and begin the long process of engaging in battles to give them experience and leveling them back up to the troops you lost.

Dynamic engines also make their appearance. Cities and castles can be customized with different buildings. These effect the economy, the population, and the stability of the area. If you create buildings which increase the economy, it gives you more money to spend from taxes, allowing you to build more buildings, etc, while if you focus on increasing the population, it gives you more militia and more soldiers to recruit. It also has a negative effect on the amount of food available. The point is, you can see that cities are engines that can be customized in different ways, producing different wide-reaching effects.

Playing style reinforcement is another strong pattern. Because skills improve as you use them, you are encouraged to specialize and focus on skills that you enjoy using.

If you have fiefs, you can optionally assign different companions to them as governors. This allows you to consider whether they would be better placed in a city, leading a caravan, a party, or staying in your own party. This is an example of the worker placement pattern.

Of course, trade is another strong pattern in this game. You can buy and sell many goods, and the economy is roughly simulated, so that as you buy more of a good in one area, the price will increase, whereas selling that same good causes the price to decrease.

The converter engine appears in several forms. Safety or stability leads to increased economic activity, for example, and over time influence will be converted into money.

The stopping mechanism appears in a few places. For example, you cannot enter negotiations with the same NPC too soon after you have already negotiated with them.


Dramatic Elements

Characters and Story

As in the previous Mount & Blade game, you start as a nobody. The main difference is that there is a main quest involving either destroying or rebuilding the Empire of Calradia.

There are hundreds of characters in the game, and they start out in the same relationships and factions each time, but they make different decisions each time, which leads to slightly different events.


Conclusion

Mount & Blade 2: Bannerlord is finally out, and it is well worth the wait. You will still encounter many bugs and strange behaviors, but it is such a vast improvement compared to Mount & Blade: Warband. You have a lot more agency, which is saying a lot. You could play in almost any way in the original, and the scope of the game has just increased. The combat still feels awesome, and growing your faction is still really engaging. The options the player is given almost always enhance the experience, and the dev team is hard at work to improve the experience, even now during the height of the covid crisis.